If you’re wondering how to replace a transmission, you’re probably in a tight spot. Replacing the transmission on your car is no easy job, but if yours isn’t working properly, then you may not have much of an option. Before you go jacking your car up and turning wrenches you may want to consider the cost. Remember, even if your car doesn’t drive it is still worth something. You can always advertise it as a mechanics special in your local car listing, donate it one of the many car donation programs like Kidney Cars, or sell it to a junkyard. Once you add up the cost of all the parts you will need, including a new transmission, and the labor to replace your transmission or the time it will take you to do it, you may be better off cutting your loses and finding a new vehicle.
You may also consider rebuilding your transmission rather than replacing it. More than likely, most of your transmission is fine and reusable, there are just a few parts that need to be replaced. It may be more economical to rebuild your transmission and reinstall it rather than installing a new, or used transmission.
How to Replace a Transmission
If you’re still interested in replacing your transmission, know the procedure will vary significantly whether you are doing it on a front wheel drive car, all-wheel drive vehicle or a truck. Because of that, our procedure will be very general and only cover the basics involved in any transmission replacement. With any maintenance item on your vehicle, start by disconnecting the negative battery cable and blocking your vehicle so it cannot roll or move. In most cases, you will have to significantly raise your vehicle in order to have enough room to remove your transmission from the bottom. Having approximately twice the height of your transmission will make the job much easier. A lift is the easiest way to do this, but if you do not have a lift, use extra care in lifting and securing your vehicle. Jack stands should be placed under frame rails, pinch welds or axles. Before you crawl under your vehicle, make sure it is absolutely secure.
To minimize the number of times you are up and down, it is smart to do everything you can under the hood before you crawl under. This can include loosening bolts, unplugging wiring harnesses and moving shift linkages. In some cases, you may even need to remove interior components like the center console to move shift linkages or gain access to wiring clips and plugs. The goal of this step is to make sure you remove anything that may be connected to the transmission so it isn’t damaged during removal.
Next, slide underneath your vehicle. Again check for wiring and connectors that you can remove as well as hoses or pipes that cross under your transmission that you may need to remove so you have room to take the transmission out. Next, drain the transmission fluid and remove the axles or drive shafts. If you have a 4 wheel drive vehicle, you may consider removing your transfer case before you remove the transmission, or it may be easier to remove them as a unit and separate them once they are out of the vehicle. Once you have all the wires, hoses and other equipment removed from the transmission, the fluid drained and the axles or drive shafts removed, you are ready to start removing the transmission.
Start by removing the bolts that attached the bell housing to the engine block. Some of these may be easier to remove from the top and some of them may require long extensions or universal joints on your sockets to remove them. Your transmission will be held in place by the alignment dowels and the input shaft so you should be safe to remove all the bolts without the transmission sliding out, but be careful as you remove the last few bolts.
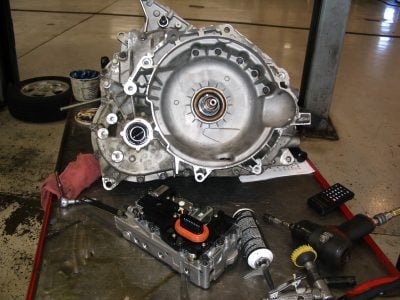 You then need to slide the transmission straight away from the engine in order to not damage the clutch or torque converter. Your transmission is supported by a cross member or an engine mount so you need to first remove that. In removing the cross member or mount, make sure you are supporting the weight of the transmission and engine with a jack or stand to keep from damaging the mounts. You need to support the transmission with a jack with wheels so you can use it to support the weight of the transmission as you slide it straight away from the engine. Once you can see the entire input shaft or torque converter you can start to lower the transmission and pull it out from under your vehicle.
Installation of your new transmission can go in the opposite order. Things can be made simpler by labeling components you remove properly and saving and labeling the nuts and bolts you remove so you can put everything back together the right way.
How do I prevent a transmission replacement?
If this explanation sounds long and arduous you’re right. Knowing how to replace a transmission doesn’t always make the job easier as they are heavy and awkward to handle and require the removal of a lot of equipment. To make sure you won’t have to replace your transmission anytime soon, make sure you do everything you can to maintain your current transmission. The best thing you can do is regularly check your transmission fluid to make sure the level is where it needs to be. The other thing you can do is make sure to change your transmission fluid at the factory recommended intervals.
Old transmission fluid can cause premature wear to your transmission necessitating a replacement, but low transmissions fluid levels are just as bad for your transmission. Regularly checking your transmission fluid level can help you catch a leak and add fluid before any damage is done. If you find your transmission fluid level low, add BlueDevil Transmission Sealer along with your new fluid to seal the leak and prevent another low fluid level in your transmission.
BlueDevil Products can be found on Amazon.com or at AutoZone, Advance Auto Parts, O’Reilly Auto Parts, NAPA, and other major auto parts retailers.
36 responses to "How to Replace a Transmission"
36 Comments
Leave a Reply
Related Articles


my 97 tnc van.makes funny sound when in drive….drives den stop with sound from the front of the car
Erin-
It is difficult for us to give you an idea of what is going on without a little more information. You could always have a certified mechanic run a diagnostic on the vehicle to help you pinpoint the possible cause of any abnormal noise.
Thank You!
-BDP
I want to replace an automatic transmission in a 2000 vw vr6, what else do I need aside from a transmission (e.g. Tranny fluid, seals, filter) ?
Josh,
Thanks for your question about your VW. If you’ve got a new or rebuilt transmission you should really only need the transmission fluid to add to the new transmission after it has been installed. It should come with a new filter and new seals and gaskets already installed so the process should be as simple as removing the old transmission and installing the new one. Since you’re doing all that work you may consider replacing your CV axles while you’re there.
If you intend on rebuilding the transmission you already have you will need a transmission rebuild kit which should come with all the necessary seals and gaskets you will need.
Thanks again for your question!
-BD Auto Pro
I want to change my 3 speed on the tree to a 4 speed automatic. What do I need? How hard is the conversion? Do I need anything else do I need a different radiator transfer case?
Clint,
Thanks for your question about your transmission. it sounds like you’re looking to replace your whole transmission which can be a pretty involved job. You’ll need a transmission that can mate to the motor you have in your car which will include the proper torque converter and bell housing. You’ll also most likely need to have a new driveshaft made as most transmissions are different lengths. Since the new transmission will be a different size you’ll also most likely need to build a new cross member to bolt to the new transmission. You may also consider changing your rear end gear ratios to better match the new transmission. Lastly, you’ll need to correct interior pieces to allow for the shift lever or a console shifter depending on your preference. All that will be more or less complicated depending on the make and model of vehicle you’re working on.
Thanks again for your question!
-BD Auto Pro
Should a transfer case be replaced when putting a remanded transmission into your car. Also I requested a ream and transmission for my vehicle and that is what I paid for. At the time the transmission had two hundred and fourteen thousand miles on it and a lot of silver in the transmission fluid. I have taken the car back five times now. We are going on six months, yes I said six months. After supposedly rebuilding my original 214000 MI transmission 5 * I am now being told there may be a problem with the transfer case. Is this something that should have been rectified and replaced along with the transmission is the replacement usually transmission alone and the transfer case a separate issue as far as replacement goes.
Kaz-
Thank you for your question. Both units are not usually replaced at the same time but with that amount of mileage, we would’ve recommended replacing both units with remanufactured parts and not rebuilt.
Thank you!
-BDP
If you put a new motor into your vehicle because the last one had to many miles, should you change your transmission too even if it looks like it’s still in good condition?
Mari-
Thank you for your question. It is not necessary to replace your transmission just because you are replacing the engine. If you are not noticing any slipping or jerking, and the fluid seems to be clean and at the proper level, then the transmission would not need to be replaced. It may be a good idea, however, to have the transmission flushed, as this is recommended maintenance in higher mileage vehicles.
Hope this helps!
-BDP
Does the engine need to come out as well on a ford escape 2004 when I change the transmission.
Dean,
Thanks for your question about your Ford Escape. You should be able to remove the transmission with the engine in place, or by removing them together. Each procedure has its benefits and its challenges so you may consider finding someone who has done the job before and asking them which way they did and what the challenges are. If you’ve got an automotive lift then you will likely have better luck getting the transmission out from under the vehicle without removing the engine. If you have an engine hoist, you may consider removing them together from the top.
Thanks again for your question!
-BD Auto Pro
Going to change my tranny on ford e 350 cargo van.what kinda gasgetts other stuff will i need to complete this job properly. Thank you for your time.
Michael,
Thanks for your question about your Ford E350 Cargo Van. Changing a transmission is a big job so our recommendation would be to find a repair manual for your specific model and year van. You’ll need that repair manual for lots of different bolt torque information as well as what the best procedure is to remove the transmission. You often can download these repair manuals online for free.
If you plan on simply replacing the transmission on your van with a new or rebuilt one the new transmission should come with all the new gaskets and seals installed so you shouldn’t anything like that, just possibly a new transmission mount if your old one is worn out. If you plan on rebuilding the old transmission we would recommend getting a full rebuild kit which should come with all the gaskets and other components you need for the job.
Thanks again for your question!
-BD Auto Pro
I’m looking to change the transmission in my 2009 Nissan Rogue. This may sound like a dumb question but is there a particular size or anything like that I should be looking for if I’m looking to buy one out of another car?
Allijiah-
Thank you for asking about your Nissan Rogue. Are you asking about replacing the transmission with a non CVT transmission or replacing it with a CVT transmission from a different vehicle? Please contact our technical support line at 888-863-0426 so that we can get a better understanding of your question and be able to make any appropriate recommendations.
Thank you!
-BDP
so i just traded a 2wd 95 mustang for an 02 chevy avalanche because alaska and the tranny was blown but it came with a used but hopefully working tranny and a new torque converter. i dont know if i have all the necessary stuff and i really need some help. is it a better idea to just take it in and have a mechanic do the work or do it by myself ? so many questions just looking for a bit of help.
Donald-
Thank you for asking about your Chevy Avalanche. It is always a better idea to let a certified ASE mechanic take a look at the vehicle and perform any necessary repairs. We recommend taking the vehicle to a transmission specialist for a proper diagnosis. Perhaps the specialist can point you in the right direction if you’d rather do the work yourself.
Thank you!
-BDP
Hello, I’m looking to replace a manual transmission In a 3 cylinder 96 Geo metro front wheel drive. The motor was rebuild only a year ago and has only 5000 miles on it, do I have to remove the motor before replacing the old transmission with a new one?
Cole,
Thanks for your question about your 1996 Geo Metro. On your vehicle, you shouldn’t have to remove the transmission in order to remove the transmission. In order to leave the motor in the vehicle, you will have to support it with an engine brace or hoist and you will be left with a very small space to maneuver the transmission through in order to remove it so it may, in the end, be easier to remove the motor and transmission together as a unit.
Thanks again for your question!
-BD Auto Pro
I’m changing my transmission in my 99 suburban do I need to remove the transfer case?
Chris-
Thank you for asking about your Chevy Suburban. If you have a 4 wheel drive vehicle, you may consider removing your transfer case before you remove the transmission, or it may be easier to remove them as a unit and separate them once they are out of the vehicle. Once you have all the wires, hoses and other equipment removed from the transmission, the fluid drained and the axles or drive shafts removed, you are ready to start removing the transmission.
Thank you!
-BDP
Hello! My 2006 chevy malibu LS has a split going up or in towards my transmission. I really cant explain it because my uncle took a look at it was telling me i might need another tranny. Now, if the leak is due to an opening somewhere when you remove the pan, you can see it leaking as if its coming from maybe a one of those hoses…im guessing what my question is could my transmission be fixed without having to be in debt trying to get another one or a nother car…smh
Denise-
Thank you for asking about your Chevy Malibu. How quickly are you losing transmission fluid? Please contact our technical support line at 888-863-0426 so that we can get a little better understanding of the vehicle’s condition and be able to make any appropriate recommendations.
Thank you!
-BDP
After I put the transmission back in and it’s all bottled back to the motor with everything hooked up,do I need to loosen the bell housing bolts when jacking the transmission up so I can put the cross member up or can I just go ahead and Jack it up and it all will b fine just the way it is and it won’t break off any bolts or crack the bell housing?
Michael,
Thanks for your question about your transmission. In our experience, there is always enough give in the motor mounts that you can jack the transmission up without damaging anything. There is very little chance of damaging the bellhousing or the block but you may tear your motor mounts if you move things too far.
Thanks again for your question!
-BD Auto Pro
I recently had someone change out my transmission. In my 07 Chrysler Pacifica touring FWD. It was replaced within a used transmission from another exact car with Lil less than 70,000 miles. Trusted my moms go to guy who has worked on her cars for various jobs for years. The issue is he isn’t a certified mechanic. After a long process of this that schedules etc. I am told that the used tranny I purchased has internal damage.and that is from him taking it in the car and run on a machine. Finally my question is could not putting the transmission in properly cause misreading like that or did I just get a bad used transmission. Just wanted to ask before I go out and buy another transmission or just give up and cut my losses?
Jennifer,
Thanks for your question about your 2007 Chrysler Pacifica. Usually even used transmission come with some type of very short warranty so the first thing we would recommend is checking into where the mechanic got the transmission and if there is any warranty at all on it. Secondly, believe it or not, installing a transmission is a pretty straight forward job. Besides causing leaks, the only problem you could cause is cracking the transmission pump housing by installing the torque converter improperly and torquing the bellhousing to the engine block. If that was the case the transmission would have gone in with a lot of difficulty. Even in this case, you could simply replace the transmission fluid pump rather than replacing the whole transmission.
It certainly is possible the used transmission was just bad to start with since it’s a 13-year-old car it’s possible the used transmission sat for a long time before you purchased it, got water in it or had some other damage but if that’s the case whoever you got the transmission from should be liable.
Thanks again for your question!
-BD Auto Pro
When putting in a new transmission in a 2012 Quest van…should you change hoses at the same time? Recently had a new transmission put in now it has to be replaced again and they are saying it is because of a certain hose that went bad. This was a new transmission ordered directly through nissan.
Kevin-
Thank you for asking about your Nissan Quest. The oil cooler hose wouldn’t necessarily be replaced when putting in the new transmission, unless there was an issue with it. The parts that would be included when putting in the new transmission are composed of bands, seals, gaskets, bushings, bearings, clutches, sealing rings and filter.
Thank you!
-BDP
I have a 2004 Jeep Wrangler and I think I rode the clutch a bit too much, the car overheated and basically didn’t drive anymore from first gear when I tried to move – it sounded as though it was in neutral and I was just revving the car. After 10 minutes it cooled down and worked normally again. Do I need a new transmission or fluid or anything?
Elena-
Thank you for asking about your Jeep Wrangler. If the vehicle seems to be working normally again, it doesn’t seem necessary to have to replace any parts. The event would have more than likely put extra wear on the clutch, however, may not have damaged to the point where it is undrivable. This is something you would want to continue to monitor. Check your fluid levels and make sure the system is topped off. Other than that, you should be good to go.
Thank you!
-BDP
I have a 2016 Chrysler town and country, one day as I was driving the car didnt want to drive pastv40mph I could get it up to 60 but with a lot of hesitation. I took it to an auto shop to get the code for what was going on, basically it read solenoid pack..we took it to a well known shop to get the solenoid replaced but were told that the code reading could be false and they needed to take out the transmission to look inside, they did that and decided the entire transmission needed replaced. My question is how is it a 2016 can have a transmission failure all of a sudden?
RbyD-
Thank you for asking about your Chrysler Town & Country. Unless you were driving the vehicle under this condition for an extended period of time, it would be difficult to say how a bad shift solenoid would lead to total transmission failure. It is not common to have this type of failure, especially on a vehicle that’s more on the newer side versus the older.
In a situation like this, it may be a good idea to get a second opinion on the matter. It could turn out that the internal damage is too bad and does require the transmission to be replaced. At least it would give you some peace of mind.
Thank you!
-BDP
My husbands 1995 GMC K2500 Suburban had stopped shifting altogether. It has a 7.8L V8, the 454 big block engine. He replaced the transmission, but it apparently still will not shift. Any advice as to what to check now that could be the issue?
Linda-
Are you saying you were still having shifting issues even after replacing the transmission? Unfortunately, the best course of action would be to bring the vehicle to a transmission specialist for diagnosis.
Thank you!
-BDP