
Repairing a head gasket leak is simple. You take off the leaky head gasket and put on a new one. You might have to peel off the old head gasket if it’s corroded onto the cylinder head, or you might have to clean off the cylinder head before you install the new one, but otherwise, it’s fairly straightforward.
You might be wondering, “If that’s true, why does my mechanic want $1,500 to repair my head gasket leak?” The sad truth is, he is not trying to scam you. That is most likely a fair cost.
The problem with replacing the head gasket is not in the replacing of the head gasket. The main problem is getting to the head gasket. The second problem is what the mechanic may find on the way to replacing the head gasket.
To make sense of this, a short primer is necessary.
The Purpose of a Head Gasket
The head gasket is a thin strip of material with openings for the cylinders. The head gasket’s one and only purpose is to prevent oil from leaking out of the cylinders and into the engine, and coolant from leaking out of the engine and into the cylinder. To do that, the gasket must make a tight fit on the cylinder head and provide an impenetrable barrier without cracks, nicks, pinholes or corrosion.
It is an easy job, but perfection for the life of the vehicle is the standard. Even a tiny space for oil or coolant to flow past can cause grievous harm to the engine. Oil in the combustion chamber can prevent the ignition of fuel that powers the vehicle. Coolant in the cylinder can prevent the pistons from pumping up and down and moving the wheels. If oil or coolant gets into other areas under the hood, further damage can occur. A blown head gasket is a major problem that must be addressed immediately.
Indicators of a Blown Head Gasket
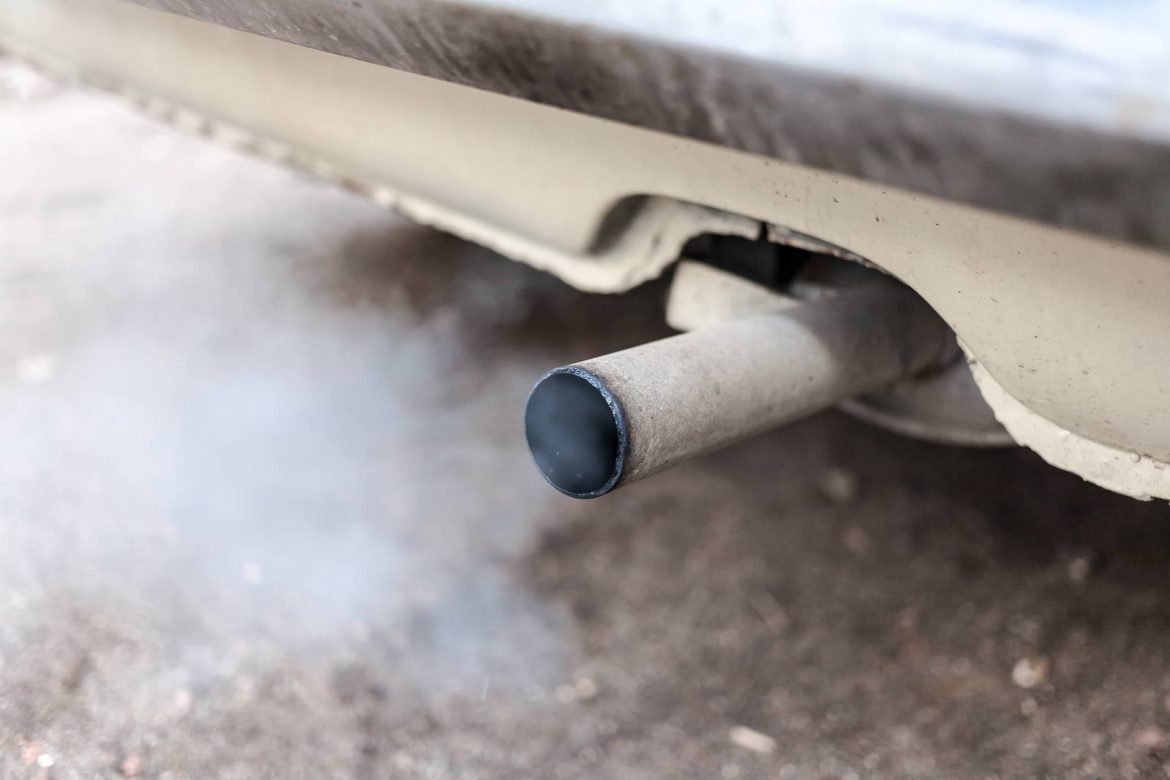
Head gasket leaks present themselves in a variety of ways. If the exhaust pipe is emitting coolant (usually green liquid or sweet-smelling steam), that suggests it has crossed the head gasket barrier. Oil spilling onto parts underneath the hood, dripping onto the driveway, fouling spark plugs, burning up, or blowing out of the exhaust pipe in the form of blue-white smoke are others. A blown head gasket can also present itself in the engine idling roughly or losing power, or in constant loss of oil.
All of these can be indicators of other problems, some of them a big deal and some of them easy and inexpensive to repair. It is a good idea to have a professional mechanic test what is causing the oil leak or coolant loss.
Why Repairing a Head Gasket Leak Is Hard
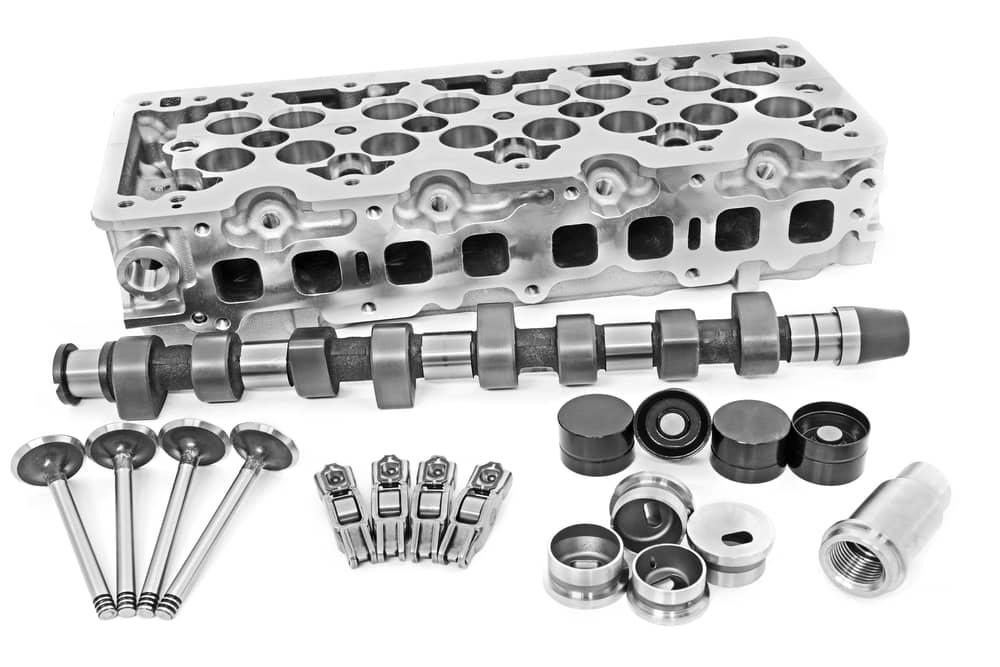
So why is accessing the head gasket so complicated? Because the entire front half of the engine is in the way. That requires removing belts and pulleys, hoses, wires, assemblies, the water pump, the spark plugs, the intake manifold, the cylinder head, and in most cases, several more items like the A/C compressor and the fuel line. Every screw, washer and bolt must be catalogued for proper re-installation. The alignment of the serpentine belt must be noted. The repair manual must be consulted for certain specifications, like the amount of torque to apply on some bolts. And so on. It may be acceptable to assemble a child’s swing set with a couple of items left over, but an internal combustion engine must be restored exactly as specified.
If oil and/or coolant have been spewing, other parts may need to be replaced. For example, the spark plugs can get ruined. That is an easy fix. But if oil has blown into the air compressor, it might require replacing. Oil, coolant and grime may need to be cleaned thoroughly from various engine parts before further progress can be made in disassembly. The cylinder walls themselves almost always require a cleaning if the head gasket has been allowing coolant to mix with the oil in the cylinder. The cylinder head may even need to be sent to a machine shop to machine it down to perfect smoothness, or the head gasket will not make a seal on it that is within acceptable tolerances.
Believe it or not, replacing a head gasket can be even harder than it sounds. Screws get stuck and become difficult to remove. Space is tight and a wrench may not easily fit into the area required to loosen a screw or remove a part. Liquid or debris can pour out of parts being removed and into places they don’t belong. In most cases the oil and coolant should be drained before embarking on the disassembly and replaced after re-assembly.
The whole process can easily chew up eight hours of a mechanic’s time at $100/hour. If new parts must be procured, that delays completion. Machining the cylinder head adds another day. The head gasket itself usually costs under $70, but the entire job rarely comes in at under $1,200. It can be much more depending on the location and the number of complications discovered once parts are removed.
Head Gasket Sealant is an Alternative
Here is the good news about repairing a head gasket leak: They don’t really “blow.” They leak, usually from a hairline crack or pinhole, from a fit that is off a couple of millimeters, or from corrosion that creates an opening in the gasket through which fluid and air under tremendous pressure can escape.
If a little Dutch boy could be found to put his finger on the tiny crack, hole or leak and hold it there, the problem would be solved.
In fact, there is such a thing, in a metaphorical sense: head gasket sealant. For somewhere around $60, a can of head gasket sealant, like BlueDevil Pour-N-Go Head Gasket Sealer, finds the cracks, holes and leaks, and seals them by bonding to their surfaces and filling the gaps.
Head gasket sealant is chemically formulated to bond to metal, aluminum, cast, alloy or plastic and it is safe for use in gas and diesel engines. It contains no particulates that can foul the engine.
Head Gasket Sealant Is Easy to Use
For optimal results, it is important to follow the directions on the bottle of head gasket sealer. Make sure the vehicle is cold. Start the engine and let it idle with the heater turned all the way up. Slowly pour in the contents of a 16-ounce bottle of BlueDevil Pour-N-Go Head Gasket Sealer, taking a full minute to empty the bottle. Replace the radiator cap and allow the vehicle to idle for an hour or so to permit the sealant to circulate through the engine. Once that is done, let the engine cool and replace the thermostat. One 16-ounce bottle of head gasket sealant is sufficient for a four- or six-cylinder engine.
Remember that the sealant is more than one little Dutch boy with a finger; it is a whole army. BlueDevil Pour-N-Go Head Gasket Sealer cures warped or cracked cylinder heads, heater cores, freeze plugs and more.
But most of all, one bottle of head gasket sealant provides a permanent solution to a leaking head gasket, avoiding a lost day or more with the vehicle in the shop and saving more than $1000.
BlueDevil Products can be found at AutoZone, Advance Auto Parts, O’Reilly Auto Parts, NAPA, Parts Authority, and other major auto parts retailers.
BlueDevil Products can be found on Amazon.com or at AutoZone, Advance Auto Parts, O’Reilly Auto Parts, NAPA, and other major auto parts retailers.
6 responses to "Why Repairing a Head Gasket Leak Is Both Easier and Harder Than You Think"
6 Comments
Leave a Reply
Related Articles

Neither one of your instructions in the beginning say to remove the thermostat definitely nothing on the bottle of the instructions. And on your Web page it says nothing about removing it until you read all way to the bottom line then it says go ahead and re installing the thermostat. Nothing on bottle. I hope I haven’t wasted $ 42 dollars. Thanks Fred
Fred-
You may use either of the Head Gasket Sealers we manufacture. The Pour N Go Head Gasket Sealer (http://store.gobdp.com/pour-n-go-head-gasket-sealer-00209/) is an easy to use, less concentrated formula that does not require the removal of the thermostat or a flush of the cooling system prior to use. Where as the 32 oz. Head Gasket Sealer “Mechanic Approved” (http://store.gobdp.com/head-gasket-sealer-38386/) requires both the removal of the thermostat and a flush before applying the product; the 32 ounce is the more concentrated formula.
The product with the yellow label will give you best overall results as long as you can remove the thermostat and flush the system prior to use. However, if the thermostat is difficult to remove or you would rather not then you can always use the “Pour N Go” Head Gasket Sealer.
Thank you!
-BDP
I have had a problem trying to get the product to work I’m thinking that Im.getting oil leaking into my coolant system not coolant getting into my oil does anyone have a solution for this I would appreciate any feed back James
James-
Unfortunately, we do not manufacture a product that will stop oil from getting into the cooling system. The BlueDevil Head Gasket Sealer would treat water/coolant getting into the engine oil, but not the other way around. A hard part repair may be your best option.
Thank you!
-BDP
Gday, can i use red devil as a temporary fix until i reach professional help. My car start with a back fire and it just idling no power at all
Coby-
Have you noticed a loss of water/coolant? Please contact our technical support line at 888-863-0426 so that we can get a little better understanding of the vehicle’s condition and be able to make any appropriate recommendations.
Thank you!
-BDP