 Changing your own oil used to be the second thing you learned to do on your car, right after changing a flat tire. With cell phones and great programs like AAA, many people don’t know how to change their own tire because help is so easily accessible in the case of an emergency. Similarly, changing your own oil has become much of a lost art as quick-lube shops have popped up all around the nation that are willing to change your oil in record times very inexpensively.
There is nothing wrong with having your oil changed by a quick-lube shop. Often times they do good work, supply a quality product and can change your oil for about the cost the parts would be to you from your local auto parts supplier. However, even if you’re not a weekend mechanic, we recommend changing your own oil at least once per year. Spending a few extra minutes underneath your car and in the engine bay every year can really help you stay acquainted with your vehicle and catch any lurking problems before they leave you stranded.
In this article, we’ll talk about how to change your oil, as well as some things to look at while you’re in the process.
How to Change your oil:
- Purchase the needed materials
- Park and secure your vehicle
- Drain the old oil
- Perform a visual inspection
- Replace the oil filter
- Add new oil
- Clean up
Changing your own oil is as simple as these 7 steps from start to finish and can usually be done in about an hour. First, make sure you purchase the correct materials so you don’t get stuck half way through the job running to the parts store. This should include new oil, a new oil filter, a drain pan, a funnel, and shop cloths for cleanup. When it comes to the type of oil and filter, check your vehicle’s owner’s manual for the correct weight oil and we would recommend spending a bit extra here to get a good filter and high quality oil.
Once you’ve got your materials purchased, head home and park your car in a safe level area. It’s always a good idea to put on the emergency brake and block the wheels since you’ll be crawling underneath your car. It’s a good idea the change your oil while your engine is still a little bit warm as it will help more old oil flow out with the suspended wear products still entrained. To drain the old oil, remove the drain plug which will be at the bottom of your oil pan, usually the lowest hanging part of your engine. Make sure your drain pan is large enough to hold the full amount of oil your engine holds to avoid messy spills.
While you’re oil is draining, it’s a great time to look for signs of problems. Start by looking for leaks. Check for oil, transmission fluid, coolant and power steering fluid leaking from seals, hoses, or gaskets. If you find a leak, you can use the appropriate BlueDevil Stop Leak Product to seal that leak. While you’re under your car you can also check the condition of your CV boots, suspension components, bushings, brakes, and tires. Look for torn boots, rotted bushings or shiny spots indicating metal on metal contact. Checking your tire tread for abnormal wear can save you a lot of money in the long run and help you know if it’s time to rotate your tires or not.
Once you’ve finished your inspection and your oil is fully drained reinstall the drain plug. Make sure not to over tighten the plug as stripping those threads can be a costly mistake. Using a gasket on your drain plug can ensure you don’t get any future leaks.
Next, you want to remove and replace your old oil filter. You should be able to remove it by hand, but if it’s stubborn you can use an oil filter wrench, a shop rag or even and old leather belt to get a better grip. Make sure to position your oil pan here as more old oil will drain from the filter location. Lube the gasket of your new filter with clean oil to ensure it can be easily removed and install it on the oil filter housing.
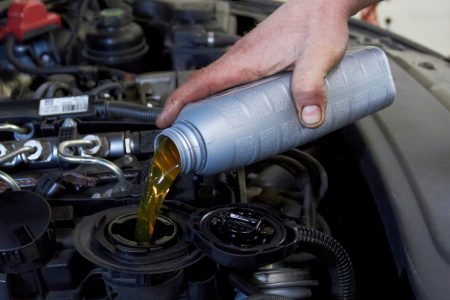
Now you’re ready to climb into the engine bay! Using your funnel, add the new oil to your engine through the oil cap. Make sure to pour slowly and avoid spills as they can be difficult to clean up and make it harder to detect leaks in the future. Add the amount of oil your owner’s manual recommends for an oil change. Make sure to check the level on the dipstick. If everything looks good, start your engine and check for leaks, noises or other signs of a problem. Let your car idle for about a minute during this inspection as long as everything looks ok. If everything looks good, shut your engine off, wait about 1 minute, then check the oil level again to ensure it is correct. It is not unusual for the level to have dropped a little bit as running your engine for the first time will fill the new oil filter and other places that were drained during the oil change. If the level is low, simply top it off with new oil and you’re ready to go!
Make sure to clean up after your project and properly dispose of your oil. We recommend transferring your old oil into a container where you can measure how much oil you removed. If you discover that you’ve removed less oil than you added, it may be an indication that your car has a leak. If you suspect an oil leak due to the amount of oil you removed or something you discovered during your inspection, add BlueDevil Oil Stop leak to your engine oil to seal that leak as your drive.
For more information about BlueDevil Oil Stop Leak, visit our product information page here: Oil Stop Leak.
To pick up any BlueDevil leak stop products, stop by any of our partnering local auto parts stores like:
- AutoZone
- Advance Auto Parts
- Bennett Auto Supply
- CarQuest Auto parts
- NAPA Auto Parts
- O’Reilly Auto Parts
- Pep Boys
- Fast Track
- Bumper to Bumper Auto Parts Specialists
- S&E Quick Lube Distributer
- DYK Automotive
Pictures Provided By:
oil_change.jpg – By Pierrephoto – Licensed by Thinkstock Photos – Original Link
BlueDevil Products can be found on Amazon.com or at AutoZone, Advance Auto Parts, O’Reilly Auto Parts, NAPA, and other major auto parts retailers.
2 responses to "How to Change Your Oil"
2 Comments
Leave a Reply
Related Articles

What product do you have for a subaru to prevent head gasket leaks 2008 outback 4cyl.
Clay-
We do not manufacture any products that should be used as a preventative maintenance. The products that we manufacture for head gaskets should only be used when a problem or leak is present.
Thank you!
-BDP